
Your Complete Roof Replacement Guide: What Texas Homeowners Should Expect Start to Finish

Introduction: Why Knowing the Process Matters
Replacing your roof is a major step in protecting your home, improving its efficiency, and preserving its value. While it’s one of the smartest investments you can make, many homeowners are understandably uncertain about how the process works. That uncertainty can lead to delays, missed maintenance, or choosing the wrong contractor.
At SunTex Roofing & Reconstruction, we believe that a well-informed homeowner is better equipped to make decisions with confidence. This guide lays out the full roof replacement process—whether you’re upgrading an aging roof, dealing with storm damage, or preparing your home for resale. If you live in DFW, Austin, or Central Texas, here’s what to expect from beginning to end.
Step 1: Start With a Comprehensive Roof Inspection
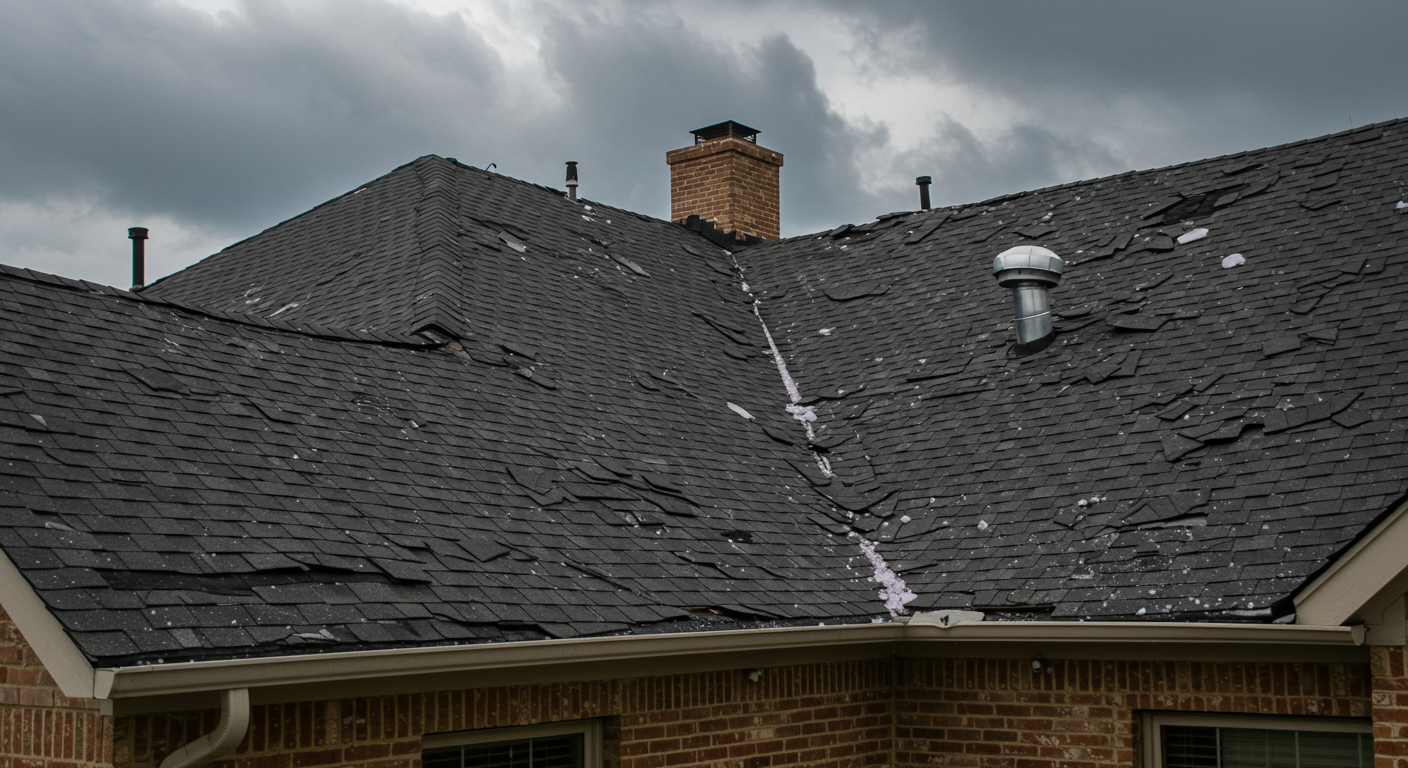
A quality roof replacement begins with understanding the current condition of your roof. Our trained inspectors look for both obvious and subtle signs of failure:
- Buckling, curling, or missing shingles
- Interior stains from slow leaks
- Sagging areas or soft spots in the decking
- Signs of aging ventilation or insulation systems
- Exposed nail heads, flashing deterioration, or excessive granule loss
Once your inspection is complete, we provide a comprehensive overview of what’s needed. You’ll receive a detailed project outline including suggested materials, anticipated repair needs, expected costs, and scheduling options.
📌 Explore what’s included in a professional roof inspection
Even small roofing problems can become major headaches. This first step is your chance to get clarity on what’s happening over your head—and to make an informed plan.
Step 2: Select the Right Roofing Materials for Your Needs
Choosing the best materials involves more than picking a color. The ideal roofing system for a home in Texas must handle sun, hail, wind, and heavy rain. At SunTex, we help you weigh performance, price, and aesthetic goals. Some popular options include:
- Architectural asphalt shingles: A popular choice for balance between affordability and durability
- Impact-resistant shingles: Ideal for hail-prone neighborhoods across North and Central Texas
- Reflective, energy-efficient shingles: Designed to reduce solar heat gain and lower cooling costs
- Designer or luxury shingles: For homeowners seeking premium style with extended warranties
We also explain warranty levels, energy codes, HOA compliance, and how your roof color may affect both curb appeal and interior temperature.
🧱 Compare roofing options on our Residential Roofing page
Step 3: Permits, Scheduling, and Preparing Your Property
With your inspection complete and your materials selected, we’ll begin preparing for construction. Our team handles all permitting and compliance work:
- Pulling required city or HOA permits
- Coordinating material and dumpster delivery
- Scheduling the job based on crew availability and your preferences
You’ll receive a pre-install checklist that covers:
- Moving vehicles from your driveway
- Securing outdoor items, pets, and patio furniture
- Informing neighbors about potential noise and activity
Every job has a dedicated project manager who oversees materials, timelines, and communication. That means no guesswork and no miscommunication during this critical prep phase.
Step 4: Tearing Off the Existing Roof
The first thing our crew does on installation day is remove every layer of the old roofing system. This includes:
- All shingles or roofing tiles
- Old felt paper or underlayment
- Flashing around chimneys, valleys, and vent pipes
A full tear-off ensures that we can spot hidden issues like rotted decking or inadequate ventilation. We protect your landscaping with tarps and clean up debris as we go. Our crews also use magnetic sweepers around your property to catch stray nails.
🧹 Preparing for a roof replacement? Read tips from our Insights blog
This phase moves fast, but it’s essential for a solid, long-lasting result. Skipping a tear-off or covering over old layers might void your new roof’s warranty or mask deeper problems.
Step 5: Repairing the Decking and Upgrading Flashing
Once the surface is clear, we examine the condition of the wood decking underneath. If any sections are:
- Water-damaged, moldy, or structurally unsound
- Improperly spaced for today’s roofing standards
We replace them before any new layers go on.
Next, we install critical flashing components, including:
- Drip edge around eaves and rakes
- Ice and water shield in valleys or vulnerable areas
- Pipe jacks, chimney flashing, and ventilation collars
- Ridge vents for modern airflow management
🛠️ Not sure if you need a new roof yet? Here are 9 signs to watch for
This stage prevents future leaks and gives your new roof the structural integrity to perform for decades—not just years.
Step 6: Installing the New Roofing System
Now the roof begins to take shape. Every product is installed according to manufacturer specifications for warranty protection and performance:
- Synthetic underlayment: A moisture barrier laid over the decking
- Starter shingles: Reinforce edges to prevent wind uplift
- Main shingles: Installed in staggered rows for optimal sealing
- Ridge caps and vents: Complete the system at the highest points
We also install or upgrade ventilation systems during this step to extend the lifespan of your roof and improve energy efficiency.
📄 Learn more about our installation methods
Step 7: Cleanup and Property Restoration
Your home should look better—not messier—after a roof replacement. That’s why SunTex Roofing takes jobsite cleanup seriously. Once your new roof is fully installed, we:
- Blow off the roof and gutters
- Sweep the lawn with magnets to remove nails
- Remove all equipment and haul away waste materials
We also walk the property with you to ensure nothing was missed. Our goal is to leave your home cleaner and safer than we found it.
🧽 See why clients trust us—visit our Reviews page
Step 8: Final Inspection and Warranty Review
Before wrapping up the job, your SunTex project manager walks you through:
- Final roof inspection and punch list
- Manufacturer and workmanship warranties
- Maintenance tips and inspection schedules
You’ll receive documentation for your records and guidance on how to register your warranty.
🗂️ Explore warranty coverage and care tips
We also discuss what to watch for in future seasons so your roof continues to perform optimally. Our support doesn’t stop at installation.
How Long Does It Take to Replace a Roof?
Most roof replacements take 1 to 3 days. However, several factors can influence the schedule:
- The pitch and size of your roof
- Material choice (e.g. shingles vs. tile)
- The need for decking repair
- Weather conditions (rain, wind, or extreme heat)
🔢 Curious how long your current roof will last? Check out this guide
We’ll provide a custom timeline at your estimate so you know what to expect from day one.
Conclusion: Let SunTex Guide You From Start to Finish
Replacing your roof doesn’t have to be overwhelming. With SunTex Roofing & Reconstruction, you get clear communication, expert craftsmanship, and dependable support throughout the process. From the initial inspection to final warranty handoff, we walk alongside you every step of the way.
📞 Schedule your free inspection or call us at 214-766-3669 to speak with a local expert today.


Flashing Fails in 80% of Leaky Roofs — What That Means for Your Home

Does Homeowners Insurance Cover Roof Leaks In Texas?
Can Hail Really Damage My Roof? (And Other Common Questions After a Texas Storm)
Explore Our Presence Around Texas
Find and click on your location below to learn more about what we've done in your area and how we can best serve your needs.

